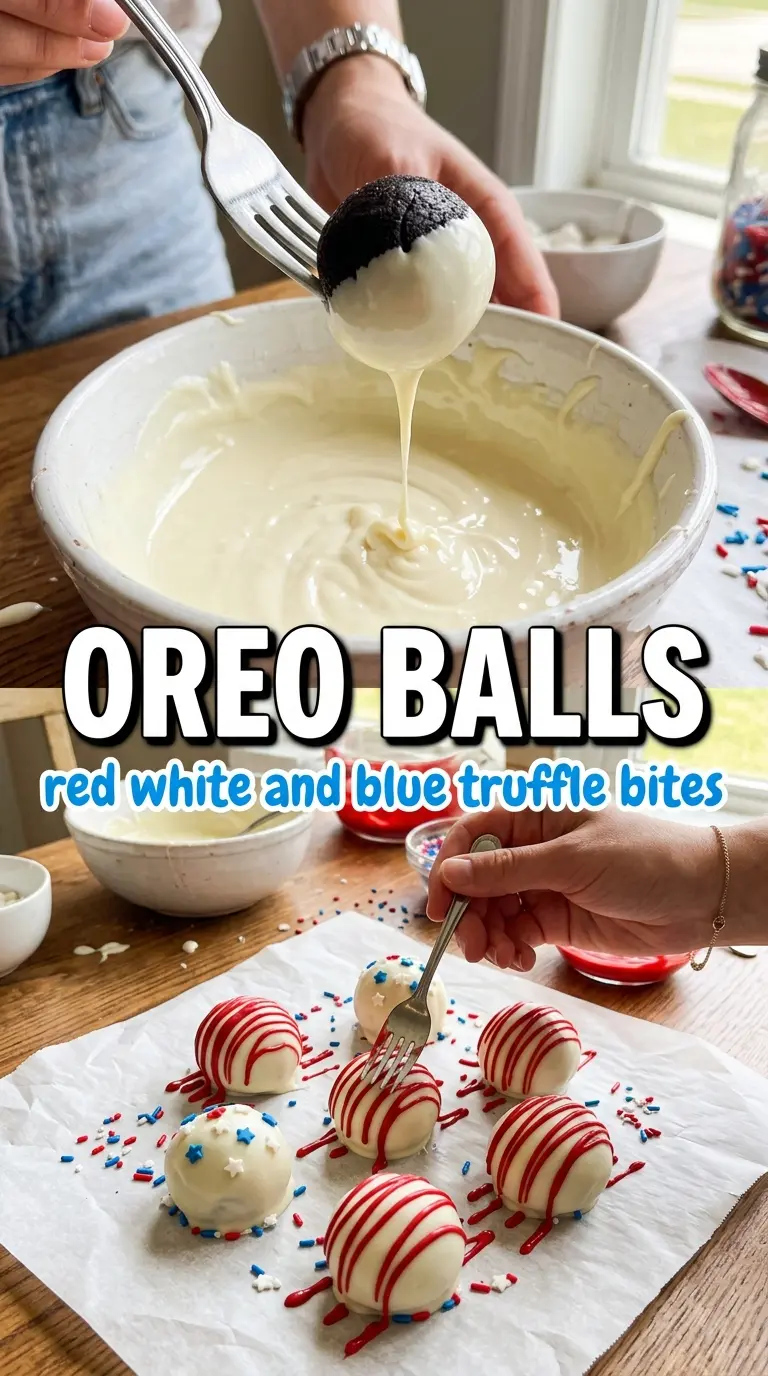
Patriotic Oreo balls hit that sweet spot between easy and festive: a fudgy Oreo center, a crisp white chocolate shell, and bright red and blue drizzle that makes the whole tray look party-ready. They disappear fast because they eat like a truffle, not a cookie, with that cool cream cheese middle giving the Oreo crumbs a dense, smooth bite.
The key is getting the crumb mixture fine and even before you add the cream cheese. Any big cookie pieces make the balls lumpy and harder to coat cleanly. Chilling them before dipping matters too. Cold centers hold their shape, which means less cracking in the white chocolate and fewer crumbs escaping into the coating.
Below, I’ll walk through the small details that keep the coating smooth, plus a few easy ways to change the look without changing the method. If you’ve ever had Oreo balls fall apart in the chocolate, the process notes here will save you some frustration.
The Oreo centers were smooth and easy to roll, and the white chocolate set up without cracking. I chilled them like you said and the drizzle held its shape beautifully.
Like this red, white, and blue Oreo ball tray? Save it to Pinterest for the next party when you need a no-bake dessert that sets up cleanly and looks festive fast.
The Part That Keeps Oreo Balls Smooth Instead of Crumbly
The difference between tidy, round Oreo balls and a sticky mess comes down to the crumb texture and the temperature of the filling. If the cookies aren’t ground finely enough, the mixture won’t compress evenly and the balls can crack as you roll them. If the cream cheese is too cold, it won’t blend smoothly and you’ll end up with little pockets of plain cream cheese that show up after coating.
Once the mixture comes together, it should feel like a dense cookie dough that holds its shape when you squeeze it. That’s the point where you stop mixing. Overworking it can warm the dough and make the balls softer than they need to be, which makes dipping harder later.
- Oreo cookies — Use the whole cookie, filling and all. The filling helps bind the crumbs, so you don’t need to scrape it out. A food processor gives you the finest texture, but if you crush them by hand, keep going until the crumbs look almost like damp sand.
- Cream cheese — This is what turns cookie crumbs into truffles. Full-fat cream cheese gives the best structure and flavor. Lower-fat versions can work in a pinch, but they tend to make the centers softer and a little less rich.
- White chocolate melting wafers — Melting wafers are the easiest coating because they set smoothly and don’t seize as quickly as regular white chocolate. If you use chopped white chocolate instead, add a little coconut oil only if needed to thin it, and melt it gently so it doesn’t get grainy.
- Red and blue candy melts — These are for the drizzle, and candy melts are better here than chocolate because they stay bright and set fast. If the drizzle is too thick, warm it in short bursts and stir between each one until it falls from the spoon in thin ribbons.
- Star sprinkles — Add them right after drizzling, while the candy coating is still wet. Once the drizzle starts to set, the sprinkles won’t stick cleanly.
What Each Ingredient Is Actually Doing in This Recipe
- Primary ingredient (the star) — Quality matters most. Choose the best you can find.
- Cooking medium (oil, butter, or broth) — This carries flavors and prevents dryness.
- Seasonings (salt, pepper, spices, herbs) — Layer flavors so nothing overpowers. Build depth gradually.
- Aromatics (garlic, onion, herbs) — Cook with fat to bloom flavors. Become the foundation.
- Supporting ingredients — Complement the main ingredient without overpowering it.
- Sauce or liquid (if applicable) — Brings flavors together. Balance richness with acid.
- Acid (lemon, vinegar, wine, or other) — Brightens and prevents flat-tasting results.
- Final finish (garnish, glaze, or sauce) — Prevents one-dimensional taste and adds visual appeal.
How to Shape, Dip, and Decorate Without Making a Mess
Building the Oreo Center
Pulse the Oreos until you have fine crumbs with no visible chunks, then mix them with the softened cream cheese until the mixture looks uniform and dark throughout. It should hold together when pressed, not feel loose or greasy. If it seems too soft to roll, chill the bowl for 10 minutes before shaping. That brief rest firms the mixture just enough to keep the balls smooth.
Chilling Before the Dip
Roll the mixture into even 1-inch balls and set them on parchment, then freeze them until they’re firm. This step is what keeps them from breaking apart in the melted white chocolate. If you skip it, the centers soften on contact and the coating can slide around or crack. Thirty minutes is usually enough, but they should feel solid all the way through.
Coating in White Chocolate
Melt the white chocolate wafers until smooth and glossy, then work with a few balls at a time. Drop each chilled ball into the coating, turn it gently with a fork, and lift it out with as little extra chocolate as possible. Let the excess drip off before setting it back on the parchment. If the coating feels too thick, it’s harder to dip cleanly, so warm it just until it flows in a smooth ribbon.
Drizzling and Finishing
Melt the red and blue candy melts separately and drizzle them in thin lines over the set white coating. Work quickly with the sprinkles because the candy melt sets faster than you think. If you want the colors to stay sharp and distinct, drizzle in light passes instead of heavy stripes. A heavy drizzle can pool and hide the clean white shell underneath.
Make Them Red, White, and Blue for Other Holidays
Swap the red and blue drizzle colors for whatever fits the event: pink and white for baby showers, orange and black for Halloween, or green and red for Christmas. The base recipe stays the same, and the white chocolate shell gives you a clean background for any color combination.
Dairy-Free Oreo Balls
Use a dairy-free cream cheese and dairy-free white chocolate coating. The texture is a little softer, so keep the centers well chilled before dipping. The flavor stays close to the original, but the shell may set a touch less firmly than traditional melting wafers.
Gluten-Free Version
Use certified gluten-free chocolate sandwich cookies in place of regular Oreos. The rest of the method stays exactly the same. Just grind the cookies into a fine crumb so the centers still roll smoothly and hold together after chilling.
Storage and Reheating
- Refrigerator: Store in an airtight container for up to 1 week. The coating stays firm, though the centers soften slightly as they sit.
- Freezer: They freeze well for up to 2 months. Freeze in a single layer first, then transfer to a container so the coating doesn’t smear.
- Reheating: These don’t need reheating. Let frozen Oreo balls thaw in the refrigerator so the chocolate stays intact and doesn’t sweat on the outside.
Questions I Get Asked About This Recipe

Patriotic Oreo Balls
Ingredients
Equipment
Method
- Crush Oreo cookies in a food processor until they become fine crumbs with no large pieces remaining.
- Mix Oreo crumbs with softened cream cheese until fully combined into a thick uniform dough.
- Roll dough into 1-inch balls and place on a parchment-lined baking sheet.
- Freeze for 30 minutes to firm up the balls before dipping.
- Melt white chocolate melting wafers according to package instructions until smooth.
- Dip each chilled Oreo ball into white chocolate using a fork, let excess drip off, and return to the parchment sheet.
- Melt red candy melts and blue candy melts separately until pourable.
- Drizzle red and blue candy melts over the coated balls in thin lines, then immediately top with star sprinkles.
- Refrigerate for 30 minutes until fully set before serving, with a firm, non-sticky coating.