Hot honey baked chicken breasts hit that sweet spot between weeknight practical and dinner-that-actually-gets-remembered. The glaze turns sticky and deep amber in the oven, clinging to the chicken instead of sliding off, and the little pops of red pepper flakes keep every bite bright, sweet, and spicy at the same time. When the chicken comes out juicy with caramelized edges, it feels like you did a lot more work than you did.
What makes this version work is the balance in the glaze. Honey gives you shine and color, hot sauce adds tang and heat, and a little butter smooths everything out so it brushes on evenly. The apple cider vinegar matters too; it keeps the glaze from tasting flat and helps the sweetness stay sharp instead of cloying. A hot oven does the rest, setting the glaze fast enough that it browns before the chicken dries out.
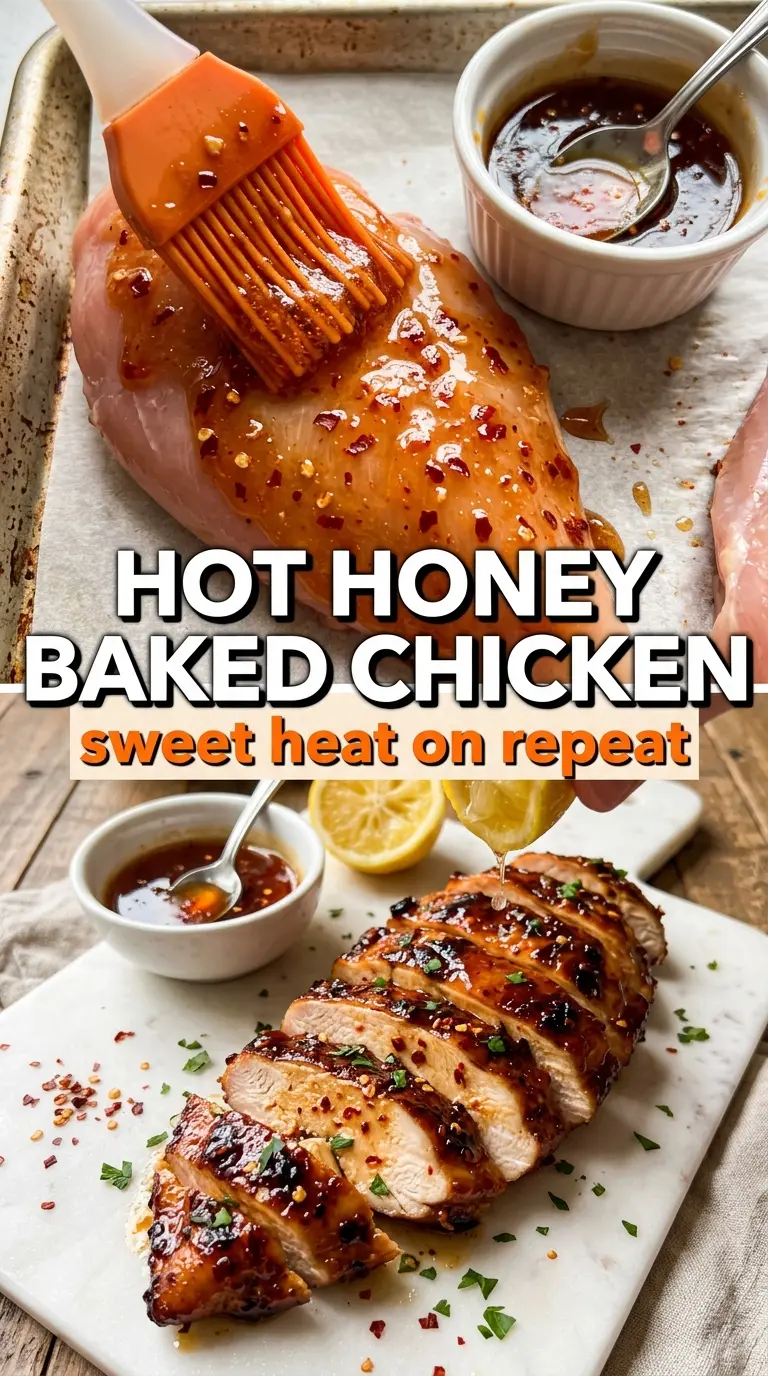
Below, I’ll walk through the small details that matter most, including how to keep the glaze from scorching and what to do if your chicken breasts are thick on one end and thin on the other.
The glaze caramelized into that sticky, amber coating I was hoping for, and the chicken stayed juicy instead of drying out. My husband kept sneaking bites from the pan before I even got it to the table.
Save these hot honey baked chicken breasts for the night when you want sticky, caramelized chicken with almost no cleanup.
The Glaze Needs Heat, But Not Too Much
The mistake most people make with honey-based chicken is treating the glaze like a sauce that can take forever in the oven. It can’t. Honey goes from glossy and dark to bitter and burned fast, especially on chicken breasts, which need enough time to cook through without leaving the glaze exposed too long. The fix is a hot oven, a thin even coat, and a mid-bake baste that refreshes the surface before it has a chance to dry out.
You’re looking for two things at the end: the chicken should register 165°F in the thickest part, and the glaze should look set, shiny, and deeply amber around the edges. If the glaze looks pale, it needs a few more minutes. If it’s getting too dark before the chicken is done, tent it loosely with foil for the final stretch so the sugar doesn’t overcook.
- Chicken breasts — Boneless skinless breasts work well here because they bake quickly and give the glaze time to caramelize. If yours are large and uneven, pound the thicker end slightly so everything cooks at the same pace.
- Hot sauce — Frank’s-style hot sauce brings vinegar, salt, and heat in one ingredient, which is why it tastes balanced instead of just spicy. A thicker, sweeter hot sauce won’t give the same sharpness.
- Butter — This helps the glaze brush on smoothly and gives it a rounder finish. Melted butter matters here; softened butter won’t whisk cleanly into the honey mixture.
- Apple cider vinegar — Don’t skip this. It keeps the glaze lively and helps cut through the sweetness, especially once it caramelizes in the oven.
What Each Ingredient Is Actually Doing in This Recipe
- Primary ingredient (the star) — Quality matters most. Choose the best you can find.
- Cooking medium (oil, butter, or broth) — This carries flavors and prevents dryness.
- Seasonings (salt, pepper, spices, herbs) — Layer flavors so nothing overpowers. Build depth gradually.
- Aromatics (garlic, onion, herbs) — Cook with fat to bloom flavors. Become the foundation.
- Supporting ingredients — Complement the main ingredient without overpowering it.
- Sauce or liquid (if applicable) — Brings flavors together. Balance richness with acid.
- Acid (lemon, vinegar, wine, or other) — Brightens and prevents flat-tasting results.
- Final finish (garnish, glaze, or sauce) — Prevents one-dimensional taste and adds visual appeal.
Building the Glaze So It Sticks Instead of Burning
Seasoning the Chicken First
Season both sides of the chicken before any glaze goes on. The salt and spices underneath do more than add flavor; they keep the chicken tasting seasoned all the way through, not just sweet on the surface. Pat the chicken dry first so the oil and glaze can cling instead of sliding off. If the breasts are very thick, give them a few extra minutes in the oven rather than cranking the heat higher, which only dries the edges.
Whisking the Hot Honey
Stir the honey, hot sauce, melted butter, vinegar, red pepper flakes, and garlic powder until the mixture looks smooth and glossy. You want it pourable, not separated. If the butter starts to solidify because the honey is cold, warm the bowl for a few seconds and whisk again. A broken-looking glaze won’t coat the chicken evenly, and the butter can pool in the pan instead of helping with browning.
Basting at the Right Moment
Brush the chicken generously before it goes into the oven, then use the remaining glaze halfway through baking. That second coat is what gives you the sticky finish and deep color. Don’t baste too early or too often, or the glaze can thin out and run off before it caramelizes. You’re aiming for a surface that looks lacquered and slightly tacky, not wet.
Resting Before You Slice
Let the chicken sit for five minutes after it comes out. That short rest keeps the juices in the meat instead of spilling onto the board the moment you cut in. If you slice immediately, even perfectly cooked chicken breasts can seem dry. Finish with flaky salt and thyme after resting so the garnish stays bright and the salt lands on the glaze, not in the pan juices.
How to Adjust the Heat, Sweetness, and Timing
Milder hot honey chicken
Cut the hot sauce back to 1 tablespoon and use the same amount of honey. You’ll still get the sweet-tangy glaze and a gentle kick, but the heat won’t linger as long. This works well if you’re serving kids or anyone who likes spice at the table but not in every bite.
Gluten-free and naturally low-carb
The recipe is already gluten-free as written, and it also fits a low-carb meal plan if you serve it with vegetables or salad instead of bread or rice. The only thing to watch is the honey, since that’s where the sugar lives. You can’t swap it for a zero-carb sweetener and expect the same sticky caramelized finish.
Using chicken thighs instead
Boneless skinless thighs work if you want a richer, more forgiving cut. They usually need a few extra minutes in the oven, but they stay juicy even if they go a little long. The glaze still caramelizes well; just watch for color, not only time, because thighs can brown faster around the edges.
Storage and Reheating
- Refrigerator: Store leftovers in an airtight container for up to 4 days. The glaze will thicken and set more firmly as it chills.
- Freezer: It freezes well for up to 2 months if wrapped tightly and stored without extra garnish. The glaze may lose a little shine after thawing, but the flavor holds up.
- Reheating: Reheat covered in a 325°F oven with a small splash of water or chicken broth until warmed through. The common mistake is blasting it in the microwave, which turns the chicken stringy and can make the glaze harden unevenly.
Questions I Get Asked About This Recipe

Hot Honey Baked Chicken Breasts
Ingredients
Equipment
Method
- Preheat the oven to 425°F and lightly oil a baking dish or cast iron skillet. The surface should look lightly coated, not pooled.
- Season the boneless skinless chicken breasts on both sides with salt, pepper, garlic powder, and smoked paprika. Press seasoning in so it adheres before baking.
- Whisk together honey, hot sauce, melted butter, apple cider vinegar, red pepper flakes, and garlic powder until smooth. Stop whisking when the glaze looks uniform and glossy.
- Place the chicken in the prepared dish and brush generously with the hot honey glaze; reserve some for basting. Coat until the surface looks evenly slick with glaze.
- Bake at 425°F for 10 to 12 minutes. Look for the glaze to begin bubbling and darkening at the edges.
- Baste with the remaining glaze once at the halfway point, then continue baking for 8 to 10 minutes. Bake until the internal temperature reaches 165°F and the glaze is caramelized into a dark amber, sticky coat.
- Rest the chicken for 5 minutes. The juices should settle and the glaze will thicken slightly as it cools.
- Finish with flaky sea salt, fresh thyme, and an extra drizzle of hot honey. Serve when the surface looks glistening and sticky.