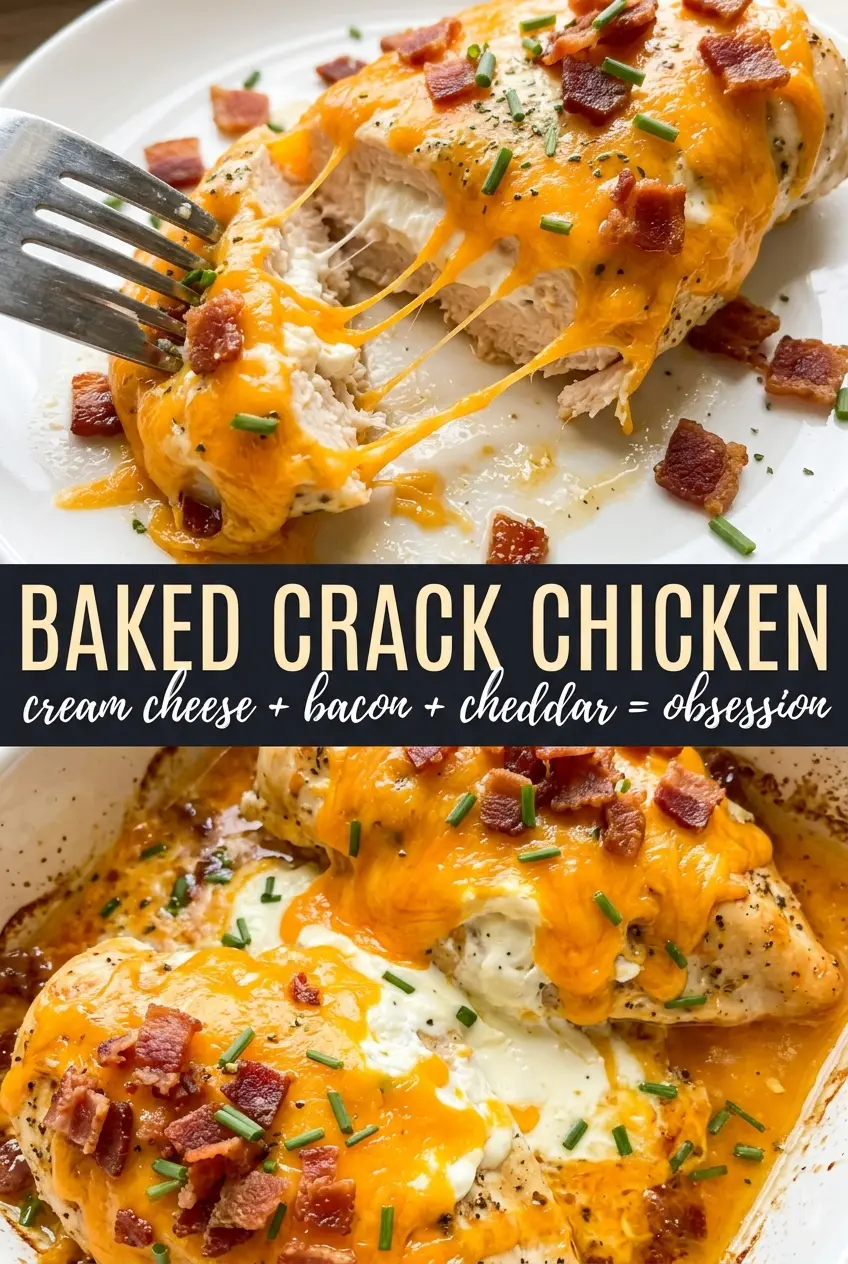
Baked crack chicken breasts come out with the kind of topping people scrape straight from the baking dish before the chicken ever reaches the table. The cream cheese melts into the ranch seasoning, the cheddar turns blistered and golden at the edges, and the bacon adds little salty pockets that keep every bite from tasting flat. Under that blanket, the chicken stays juicy instead of drying out, which is what makes this version worth making more than once.
The trick is simple: soften the cream cheese enough that it spreads without tearing the chicken, then bake just until the center hits 165°F. If the cheese mixture goes on cold, it clings in thick lumps and never settles into that smooth, molten layer. If the oven runs hot or you leave it in too long, the chicken turns stringy before the topping gets that browned finish. This is the kind of dinner that looks like comfort food and still behaves like a weeknight recipe.
Below, I’ve included the small details that keep the topping creamy, the bacon crisp, and the chicken from going bland under all that richness.
The cream cheese melted into a smooth layer and the bacon stayed crisp on top instead of getting soggy. I baked it for 28 minutes and the chicken was perfectly juicy.
Save these baked crack chicken breasts for the nights when you want a creamy, bacon-loaded dinner with almost no cleanup.
The Part That Keeps the Topping Creamy Instead of Greasy
The whole dish depends on how the cream cheese behaves in the oven. If it’s too cold, it sits in thick patches and the ranch seasoning never spreads evenly. If it’s overmixed with the cheddar before baking, the topping can turn dense instead of staying soft and spoonable. The goal is a smooth layer that melts over the chicken and bakes into a bubbling cap, not a stiff paste.
Another thing that matters here is thickness. Chicken breasts that are wildly uneven finish at different times, which is how one piece dries out while another is still catching up. Pound the thick ends lightly or buy smaller, even breasts if you can. That one step does more for the final texture than any extra seasoning ever will.
What Each Ingredient Is Actually Doing in This Dish

- Chicken breasts — These need to be boneless and skinless so the topping can sit directly on the meat and form that baked crust. If your breasts are very large, slice them in half horizontally or pound them to an even thickness so they finish at the same time.
- Cream cheese — This is the backbone of the topping. Full-fat cream cheese gives the smoothest melt and the richest finish; low-fat versions can turn a little loose or grainy once baked. Soften it fully at room temperature before mixing.
- Ranch seasoning — This brings salt, herbs, and a little tang without requiring a long ingredient list. A packet works fine here, but if your seasoning blend is extra salty, hold back on adding much salt to the chicken itself.
- Bacon — Cook it until crisp before it goes on top. Underbaked bacon turns chewy in the oven, and this dish needs the contrast of crisp bits against the soft cheese layer.
- Cheddar cheese — Sharp cheddar gives the best payoff because it cuts through the richness. Pre-shredded cheese melts fine, but freshly shredded cheddar melts more evenly and browns better on top.
- Chives — These brighten the finished dish and keep the topping from tasting heavy. Add most of them after baking so the flavor stays fresh.
How to Build the Topping So It Bakes, Browns, and Stays Juicy
Season the Chicken First
Lay the chicken breasts in a greased 9×13 dish and season them lightly with salt and pepper before anything else goes on top. That small layer of seasoning matters because the cheese topping is rich and can mute bland chicken fast. Keep the salt modest if your ranch mix and bacon are especially salty. The chicken should look lightly seasoned, not coated.
Make the Cream Cheese Mixture Smooth
Beat the softened cream cheese with the ranch seasoning until it turns completely smooth and spreadable. If you still see lumps, keep mixing before it goes onto the chicken, because those lumps stay obvious after baking. Spread the mixture thickly over each breast so it forms an even layer from edge to edge. If you leave bare spots, they dry out in the oven.
Finish with Bacon and Cheddar
Scatter the crispy bacon over the cream cheese first, then add the cheddar on top. That order helps the bacon stay visible and keeps it from sinking into the cheese layer. Bake at 375°F until the topping is bubbling and the chicken reaches 165°F in the thickest part, which usually takes 25 to 30 minutes. If the cheese is browned before the chicken is done, tent loosely with foil and keep baking until the temperature is right.
Let It Land Before You Garnish
Give the dish a minute or two out of the oven so the topping settles slightly instead of sliding off the chicken the second you cut into it. Then finish with chives and a little extra bacon. Serve it right away while the cheese is molten and the edges are still crisp. This dish loses its best texture if it sits too long.
How to Adapt This for Low-Carb, Lighter, or Bigger-Batch Dinners
Make It Even More Keto-Friendly
The recipe is already low in carbs, so the main thing is to check your ranch seasoning label for added sugar or starch. Serve it with roasted broccoli, cauliflower mash, or a simple green salad to keep the whole plate in the same lane. You’ll still get the full bacon-and-cheddar payoff without changing the method.
Use Chicken Thighs Instead
Boneless, skinless thighs work well if you want a juicier, more forgiving cut. They usually need a few extra minutes in the oven, and the richer meat stands up nicely to the cream cheese topping. The dish becomes a little more decadent, not lighter, but it stays tender even if you pull it a minute late.
Swap in Turkey Bacon
Turkey bacon gives you the smoky note with less richness, but it won’t crisp the same way real bacon does. Cook it until well browned before chopping it, or it can taste soft and a little flat once baked into the cheese. This version is a good compromise, just not an exact match for the original texture.
Make It Ahead for a Busy Night
You can assemble the dish a few hours ahead and keep it covered in the refrigerator until baking time. Let it sit on the counter while the oven preheats so the center isn’t ice-cold when it goes in. That helps the topping melt evenly instead of browning before the chicken cooks through.
Storage and Reheating
- Refrigerator: Store leftovers in an airtight container for up to 4 days. The topping firms up as it chills, but the flavor holds well.
- Freezer: It freezes, though the cream cheese texture softens a bit after thawing. Wrap portions tightly and freeze for up to 2 months for best results.
- Reheating: Reheat covered at 325°F in the oven until warmed through, or use short bursts in the microwave at medium power. High heat can make the chicken dry and cause the topping to separate.
Questions I Get Asked About This Recipe
Baked Crack Chicken Breasts
Ingredients
Equipment
Method
- Preheat oven to 375°F and grease a 9x13 baking dish.
- Place the prepared baking dish in the oven while it heats, then remove once preheated to keep your assembly clean and fast.
- Season the chicken breasts lightly with salt and pepper and place them in the prepared dish.
- Beat the softened cream cheese with the ranch seasoning mix until smooth, then spread a thick layer over each chicken breast.
- Top each breast with crumbled bacon, then add shredded cheddar cheese over the top.
- Bake for 25-30 minutes, until the topping is golden and bubbly and the internal temperature reaches 165°F.
- Garnish with extra fresh chives and crumbled bacon, then serve immediately.