American Flag Taco Dip always disappears fast because it gives you everything people want from a party dip: creamy layers, a little spice, cool sour cream, and a salty crunch when the chips hit the bottom. The flag design turns a familiar layered taco dip into something fun enough to put in the center of the table, and the best part is that it still tastes just as good as it looks.
The structure matters here. Softened cream cheese gets mixed with taco seasoning so the base stays smooth instead of lumpy, and the layers go in the right order so the top stays neat when you decorate it. Chilling it for 30 minutes helps the layers settle, which makes the stripes easier to pipe and keeps the dip from sliding around when it gets carried outside or to a buffet.
Below, I’ve included the small details that make the flag design hold its shape, plus a few smart swaps if you want to adjust the heat, make it ahead, or use what you already have in the fridge.
The cream cheese layer was smooth and the sour cream stripes stayed clean after chilling. I used pico instead of chunky salsa, and the red rows still held their shape under the olives.
Save this American Flag Taco Dip for a patriotic party spread with clean sour cream stripes and that bold blue olive corner.
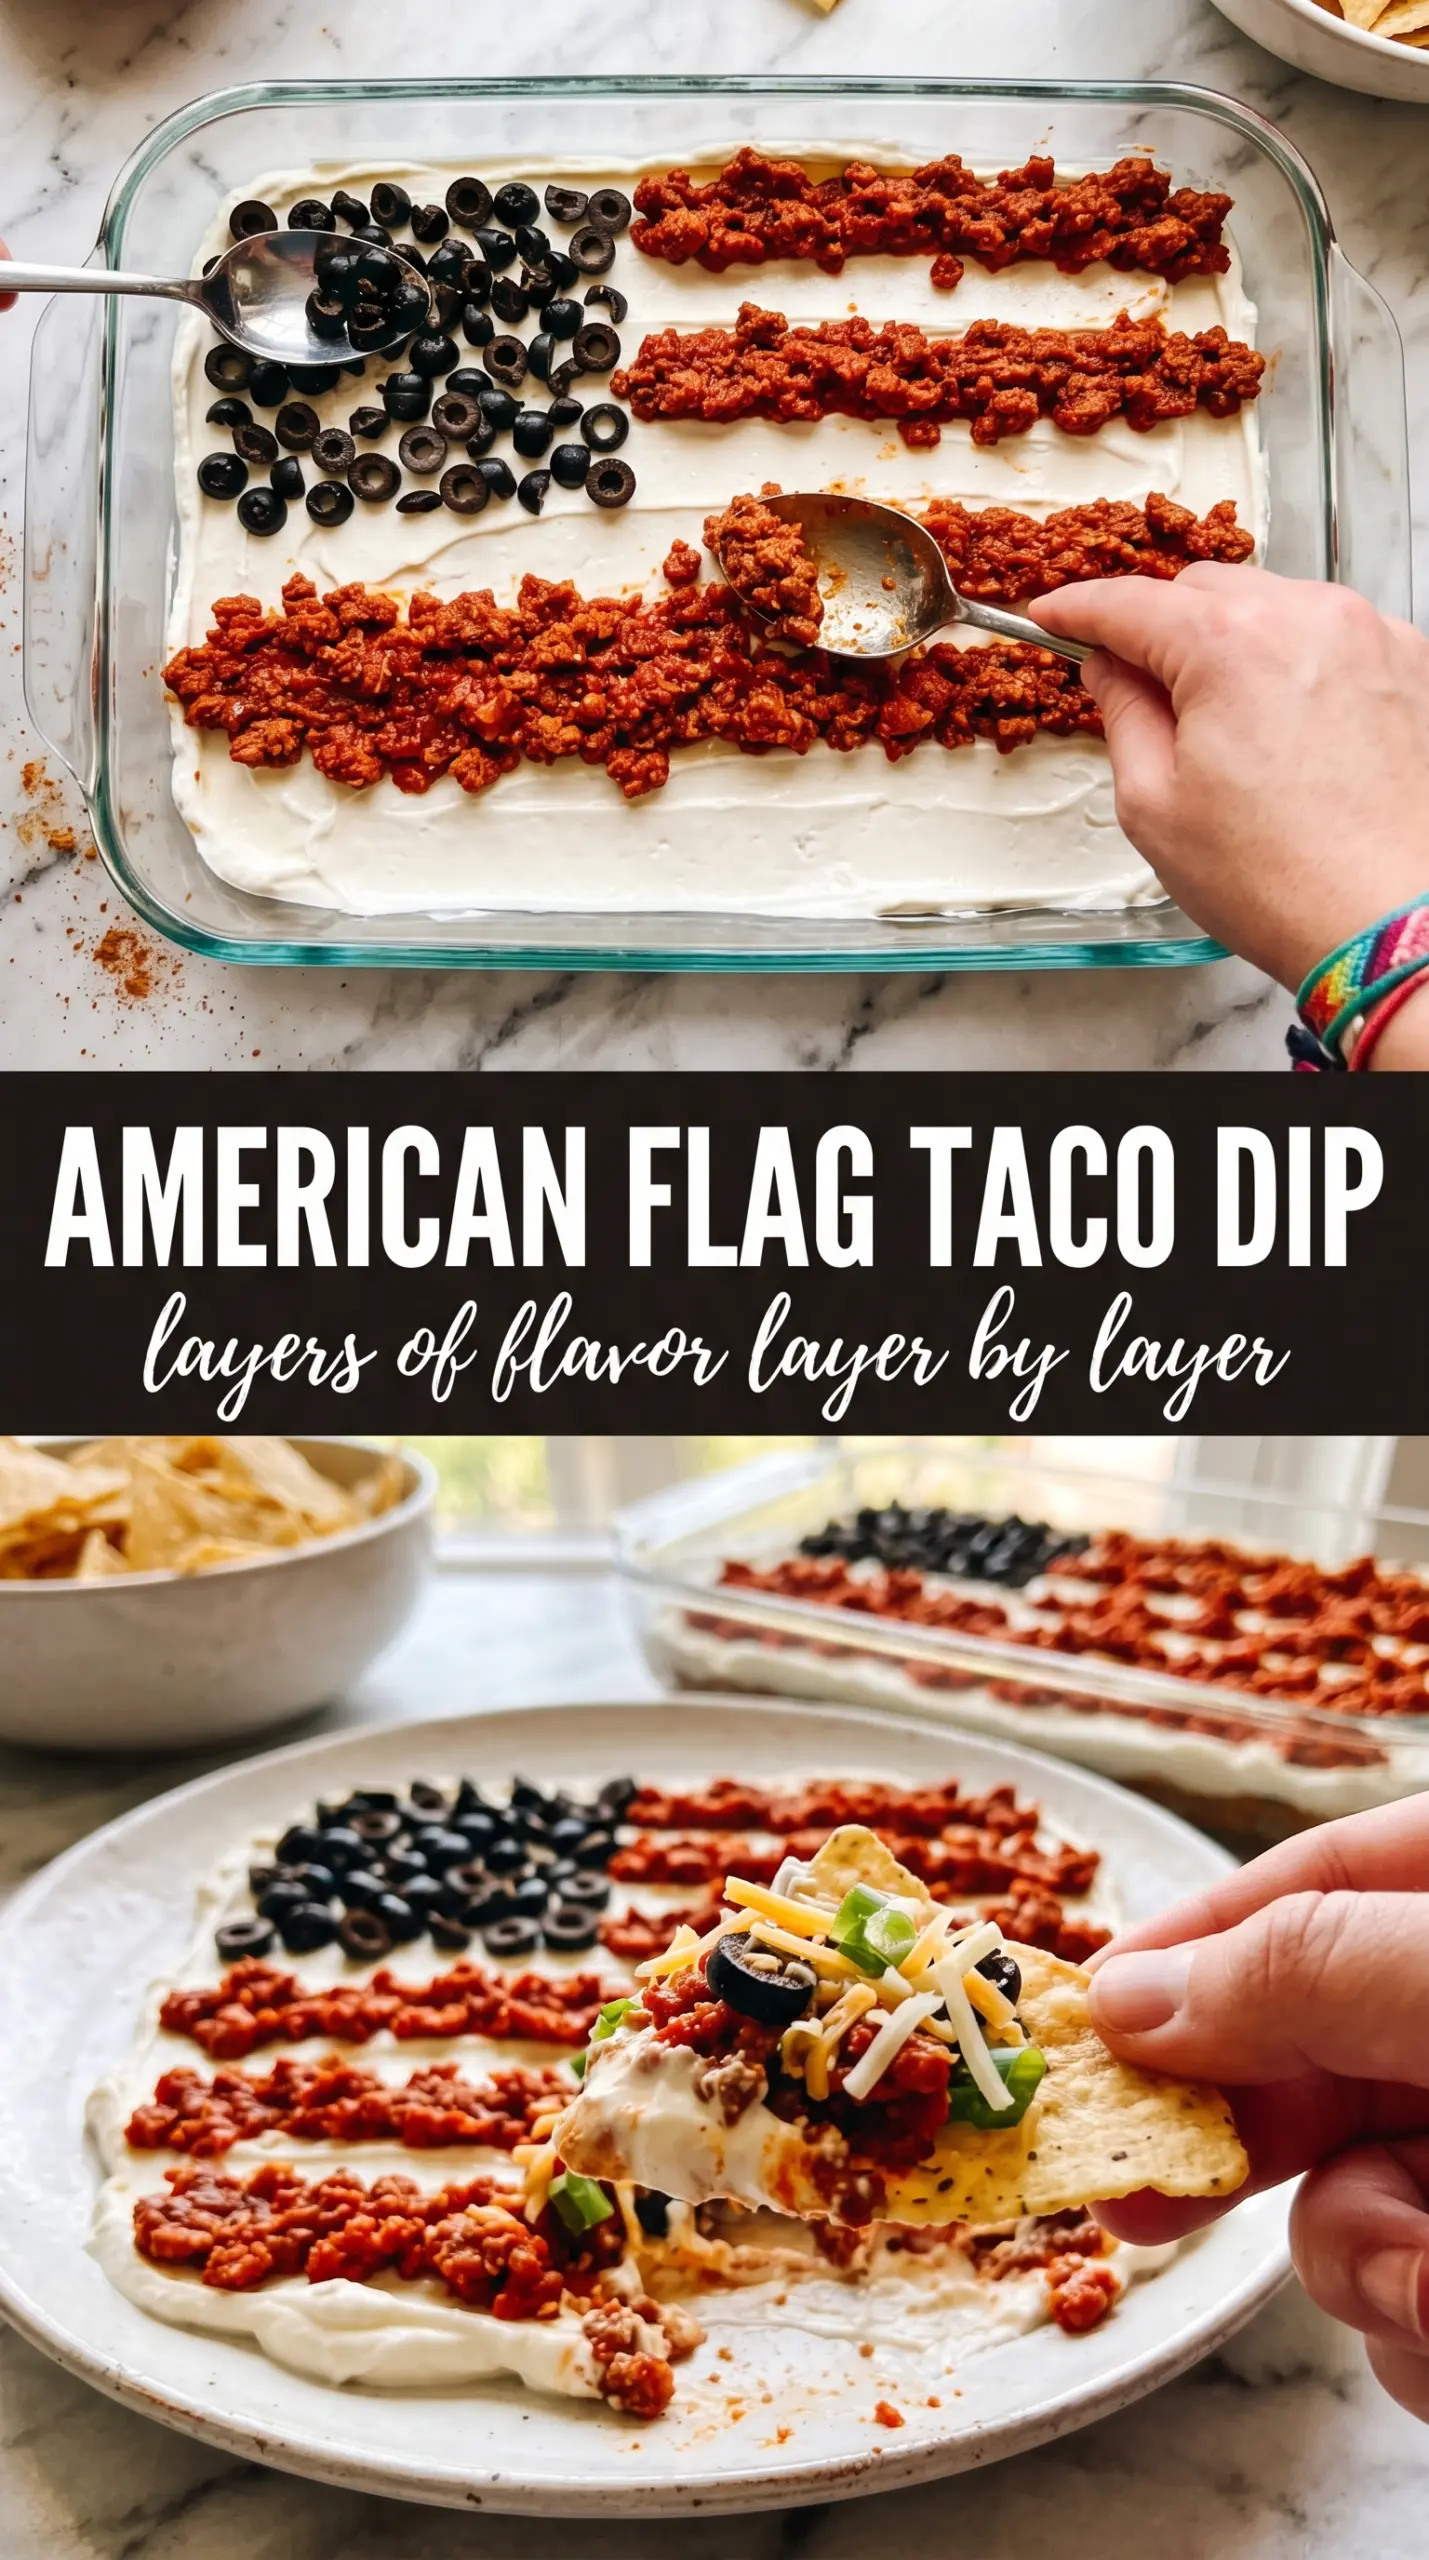
Why the Layers Need to Be Built in the Right Order
The order here isn’t just about looks. Refried beans go on the bottom because they’re sturdy and keep the dish anchored, while the cream cheese mixture needs to sit above them so it can stay smooth and spreadable. If you put the wetter layers too low or skip the chill, the whole thing starts to slump when you add the flag decoration.
The second thing people miss is texture control. A chunky salsa or pico gives you enough body for the red stripes to look distinct, but watery salsa will bleed into the sour cream and blur the design. Drain off excess liquid if your salsa is loose, and keep the cream cheese softened so the middle layer doesn’t tear the beans underneath.
What Each Ingredient Is Actually Doing in This Dip
- Refried beans — These form the base that keeps the dip stable enough to slice or scoop. Regular canned refried beans work fine, but if they’re very thick, stir in a spoonful of water or salsa so they spread without tearing the bottom layer.
- Cream cheese — This is what gives the middle layer body and keeps the taco seasoning from disappearing into the beans. Soften it fully before mixing or you’ll end up with little lumps that make the top uneven.
- Taco seasoning — This seasons the cream cheese layer with enough punch to taste through all the cool toppings. A standard packet works, but if yours is extra salty, use a little less and taste before adding more.
- Sour cream — This is the white stripe layer, so thickness matters. Full-fat sour cream pipes cleaner than reduced-fat versions, which can look loose after chilling.
- Chunky salsa or pico de gallo — This gives you the red rows and the fresh tomato bite. Choose a thicker salsa if you want sharper lines; very juicy pico looks fresh but needs a little draining first.
- Guacamole — This adds a creamy avocado layer that fits right between the cheese and the flag decoration. Store-bought guacamole works here if it’s thick; thin, overly citrusy guac can make the middle taste sharp and wet.
- Black olives and green onions — The olives create the blue canton, and the green onions finish the top with a fresh bite. Slice them small so they sit flat and don’t make the design bumpy.
Building the Flag So It Stays Clean
Start With a Flat, Even Base
Spread the refried beans into the dish in a firm, even layer that reaches the corners. If the beans are cold and stiff, they’ll drag across the pan and make the next layer patchy, so let them sit out briefly or loosen them with a spoonful of salsa. The goal is a smooth surface, not perfection with a knife; the cream layer will hide minor ridges.
Mix the Cream Cheese Until It’s Silky
Blend the softened cream cheese with the taco seasoning until the color is uniform and there are no pale streaks. If the cream cheese is still cool in the center, it will stay grainy no matter how long you stir, so give it time to soften before you start. Spread it gently over the beans so you don’t pull the bottom layer up with it.
Pipe the Stripes, Don’t Spoon Them
Spoon the sour cream into a piping bag or a zip-top bag with the corner snipped off, then pipe the stripes across the top. Piping gives you cleaner lines and keeps the red salsa from sinking into the white layer. If the sour cream is too loose, chill it for a few minutes first; that small step makes a big difference in how crisp the stripes look.
Finish the Canton Before the Garnishes
Place the olives tightly in the upper left corner so they read as a solid blue rectangle from the top. Then add the red rows and scatter the green onions last, because once you start moving the topping around, the clean flag lines get messy fast. Chill the finished dip for 30 minutes so the toppings settle and the layers hold together when you serve it.
How to Adapt This for Different Parties and Diets
Make It Gluten-Free Without Changing the Flavor
The dip itself is naturally gluten-free if your taco seasoning is safe, but the seasoning packet is the part to check. Serve it with certified gluten-free tortilla chips and you’ve got the same layered texture without changing the way the dip eats.
Use Greek Yogurt in Place of Sour Cream
Plain Greek yogurt works if you want a lighter topping, but it tastes tangier and can look a little softer once chilled. Choose full-fat yogurt for the closest texture, and pipe it only after the dip has chilled so it doesn’t smear into the salsa rows.
Swap the Guacamole Layer for Avocado Mash
If you don’t have guacamole, mash ripe avocado with a little lime juice and salt, then spread it on in a thin layer. It tastes fresher and less seasoned than store-bought guac, so the cream cheese layer does more of the flavor work.
Storage and Reheating
- Refrigerator: Cover tightly and chill for up to 2 days. The stripes will soften a little, but the dip still tastes great.
- Freezer: Don’t freeze this one. The sour cream, guacamole, and cream cheese layers separate and turn watery after thawing.
- Reheating: No reheating needed. Serve it cold straight from the fridge, and if it sits out for a while, give it a quick touch-up with fresh onions or a few extra olive slices before serving.
Answers to the Questions Worth Asking

American Flag Taco Dip
Ingredients
Equipment
Method
- Spread the refried beans in an even layer across the bottom of a large rectangular baking dish or serving tray.
- Mix the softened cream cheese with the taco seasoning until smooth, then spread it evenly over the bean layer.
- Spread the guacamole over the cream cheese layer, then top with the shredded Mexican cheese blend.
- Spoon the sour cream into a piping bag or zip-lock bag with a corner snipped and pipe horizontal white stripes across the top of the dip.
- Add rows of salsa or diced red tomato between the sour cream stripes to create the red stripe effect.
- In the upper left corner, arrange the sliced black olives tightly to form the blue canton rectangle.
- Scatter the green onions across the top.
- Chill the dip for 30 minutes, then serve with tortilla chips.