This Cannoli Cake brings the classic Italian treat to your dessert table! It features fluffy cake layers filled with sweet ricotta cream and chocolate chips, just like traditional cannoli.
You won’t believe how tasty each bite is! It’s perfect for celebrations or just when you want a special treat at home. I love serving it chilled—with a dusting of powdered sugar on top for an elegant touch!
Key Ingredients & Substitutions
All-Purpose Flour: This creates the cake structure. For a gluten-free option, use a 1:1 gluten-free flour blend.
Ricotta Cheese: You’ll want high-quality, well-drained ricotta for the filling. If you can’t find ricotta, cottage cheese blended until smooth is a good substitute. You can also use cream cheese for a richer flavor.
Mascarpone Cheese: Adds creaminess to the filling. If you’re in a pinch, you can use cream cheese mixed with a bit of heavy cream for a similar texture.
Granulated Sugar: This adds sweetness to the cake. You can use coconut sugar or a sugar substitute like Stevia if you’re looking for a lower-calorie option.
Whipped Cream: For decoration, homemade is best for flavor, but store-bought is totally fine if you’re short on time.
How Do I Ensure My Cake Layers Are Fluffy and Moist?
To achieve the perfect cake layers, proper mixing and baking are key. Here’s how:
- Beat Butter and Sugar Well: Creaming them together well makes your cake light and airy, so mix until fluffy.
- Don’t Overmix: After adding flour and milk, mix just until combined. Overmixing can make it dense.
- Check for Doneness: Use the toothpick method. Insert into the center, and if it comes out clean, your cakes are done.
Allow to cool completely before frosting to prevent melting the filling. These steps help keep your Cannoli Cake soft and delicious!
How to Make Cannoli Cake
Ingredients You’ll Need:
For the Cake:
- 2 ½ cups all-purpose flour
- 2 ½ tsp baking powder
- ½ tsp salt
- 1 cup unsalted butter, softened
- 1 ¾ cups granulated sugar
- 3 large eggs
- 1 tbsp vanilla extract
- 1 cup whole milk
For the Cannoli Filling:
- 2 cups ricotta cheese, drained well
- 1 ½ cups mascarpone cheese
- 1 cup powdered sugar, sifted
- 1 tsp vanilla extract
- ¾ cup mini chocolate chips (plus extra for decorating)
For Decoration:
- Mini cannoli shells (about 10-12)
- Chocolate chips
- Rainbow sprinkles
- Whipped cream (for piping)
- Chocolate sauce or melted chocolate (for drizzling)
How Much Time Will You Need?
This Cannoli Cake takes about 30 minutes to prepare, plus around 30-35 minutes to bake, and then you’ll want to chill it for at least 2 hours before serving. So, set aside about 4 hours to let everything come together perfectly!
Step-by-Step Instructions:
1. Prepare the Cake Layers:
Start by preheating your oven to 350°F (175°C) and greasing and flouring two 9-inch round cake pans. In a medium bowl, sift together the flour, baking powder, and salt. In a large bowl, cream the softened butter and granulated sugar with an electric mixer until it’s light and fluffy. Add the eggs one at a time, mixing well after each addition. Pour in the vanilla extract.
Now, alternately add the flour mixture and milk to this butter mixture, starting and ending with the flour. Mix just until everything is combined. Divide your batter evenly between the prepared pans and bake for about 30-35 minutes. You can tell they’re done when a toothpick inserted in the center comes out clean. Let the cakes cool in the pans for 10 minutes before transferring them to a wire rack to cool completely.
2. Prepare the Cannoli Filling:
While your cakes cool, let’s make the delicious filling! In a medium bowl, beat together the ricotta cheese and mascarpone until smooth and creamy. Add in the sifted powdered sugar and vanilla extract, continuing to mix until it’s fully incorporated. Gently fold in ¾ cup of mini chocolate chips. Once mixed, cover and refrigerate the filling until you’re ready to use it. This will help it firm up a bit.
3. Assemble the Cake:
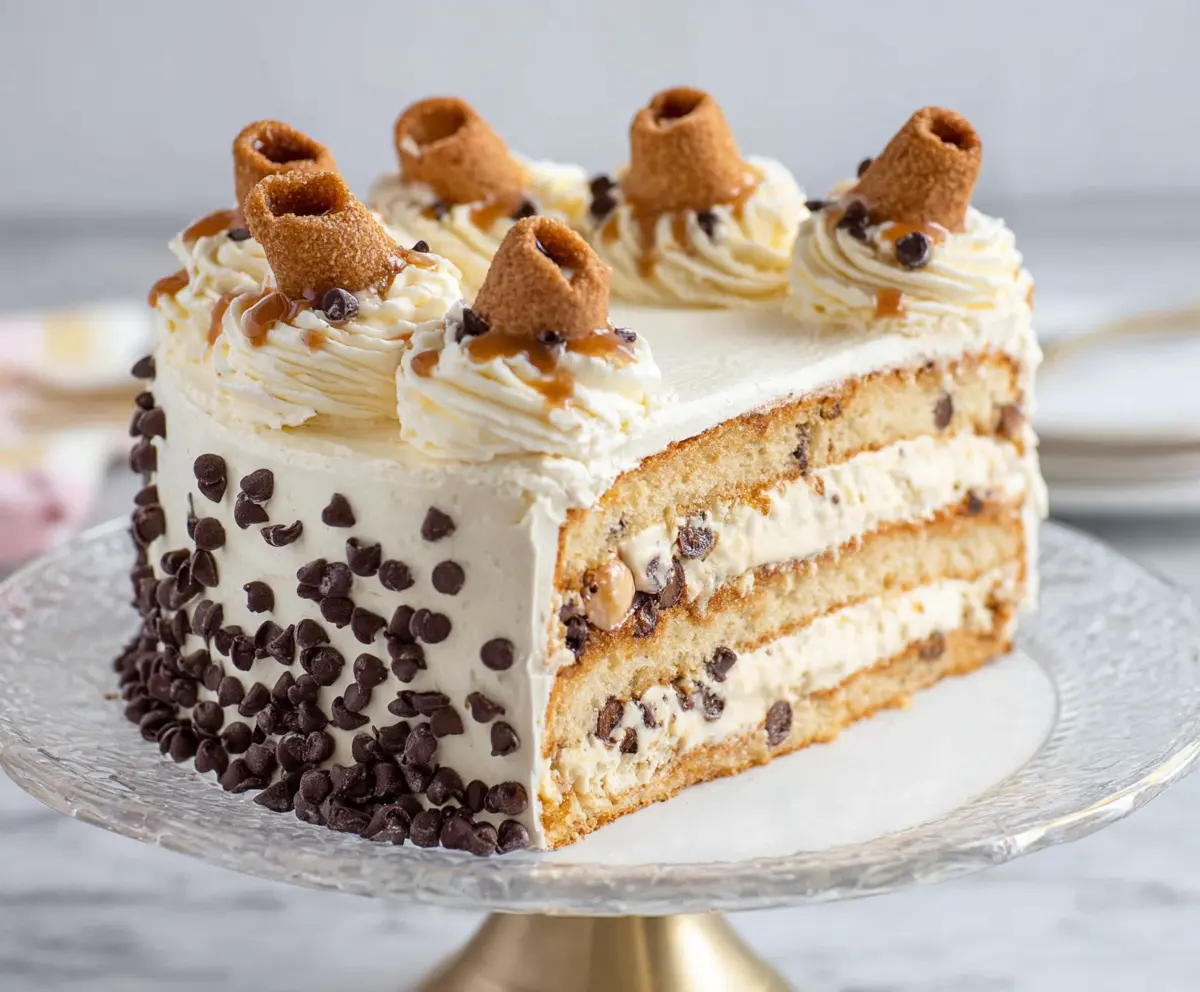
Now that everything is ready, it’s time to build your cake! Place one cake layer on a serving plate and spread about half of the cannoli filling evenly over it. Carefully place the second cake layer on top, and then frost the top and sides with the remaining cannoli filling or whipped cream for a beautiful touch!
4. Decorate the Cake:
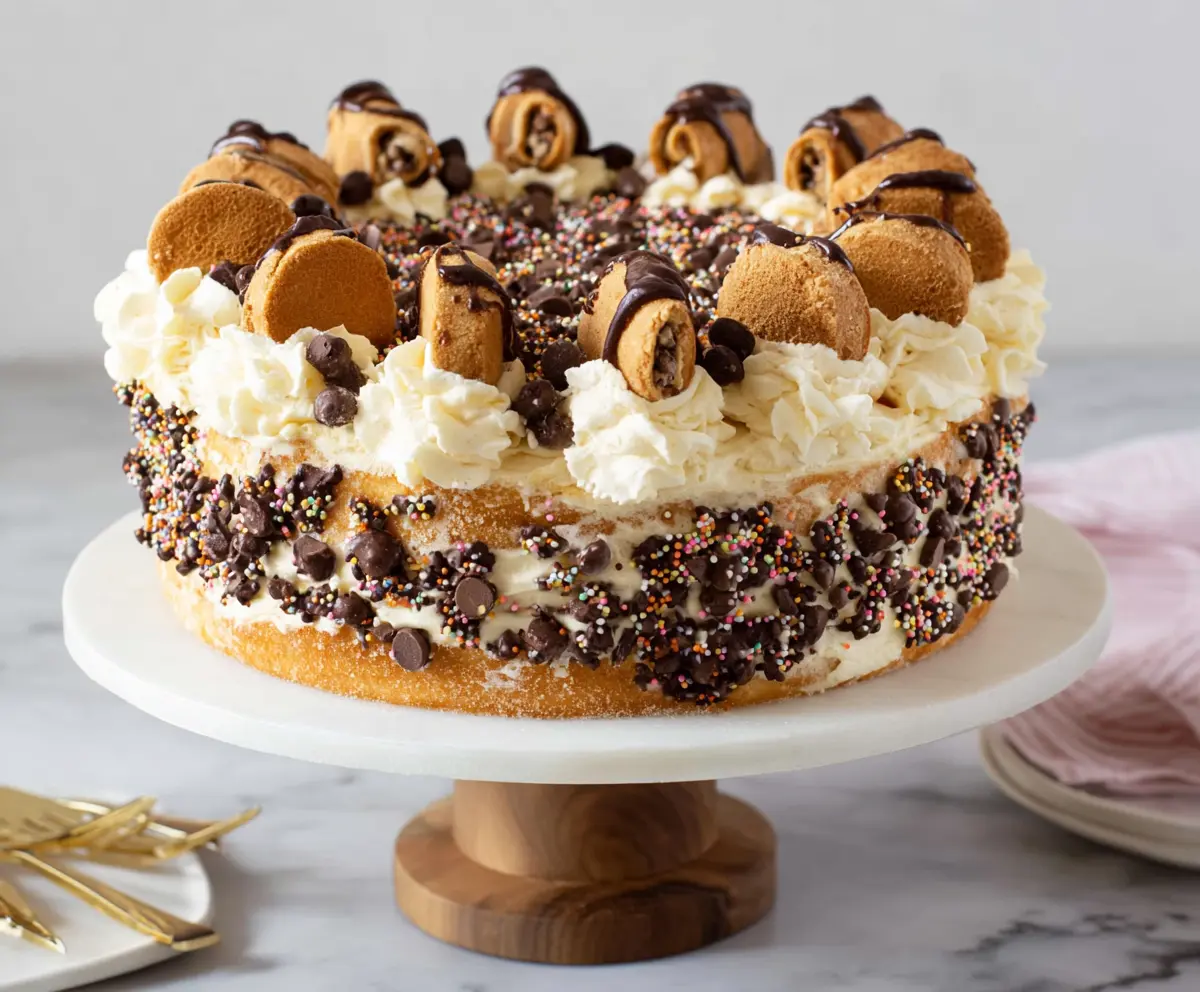
Let’s make it pretty! Press mini chocolate chips and rainbow sprinkles around the sides of the cake for extra charm. Pipe some whipped cream rosettes or dollops around the top edge for a lovely decoration. Place your mini cannoli shells upright on the whipped cream borders, and drizzle melted chocolate or chocolate sauce over the tops. Don’t forget to sprinkle a few more chocolate chips and rainbow sprinkles in the center for that festive look!
5. Chill and Serve:
For the final step, refrigerate your beautiful Cannoli Cake for at least 2 hours to allow the filling to set properly. When you’re ready to enjoy, slice it up and share the deliciousness with friends or family. Enjoy every bite of your amazing Cannoli Cake!
Can I Make This Cake Ahead of Time?
Absolutely! You can bake the cake layers a day in advance and store them wrapped in plastic wrap at room temperature. Prepare the filling the same day you plan to assemble the cake, or keep it refrigerated for up to 2 days.
How Do I Store Leftovers?
Store any leftover Cannoli Cake in an airtight container in the refrigerator for up to 3 days. It’s best enjoyed chilled, so reheat only if desired; otherwise, serve cold!
What Can I Use Instead of Mascarpone?
If you can’t find mascarpone, you can mix cream cheese with a bit of heavy cream to achieve a similar texture and flavor. It works well in the filling!
Can I Use a Different Type of Chocolate?
Absolutely! You can swap mini chocolate chips for dark, milk, or even white chocolate chips according to your preference. Just ensure that whatever you use is well-chopped if it’s a bar type for easy incorporation into the filling.