Glossy teriyaki chicken comes down to two things: a sauce that turns sticky instead of thin, and chicken thighs that stay juicy while the edges caramelize hard in the pan. When both happen at once, you get that deep amber coating that clings to the meat and settles into the rice underneath. It’s the kind of dinner that tastes like it took more effort than it did.
This version keeps the sauce simple, but it doesn’t cut corners where it counts. Soy sauce gives the backbone, brown sugar and honey handle the shine, and a little cornstarch slurry tightens everything at the end so the glaze actually coats the chicken instead of pooling in the skillet. Marinating for just 20 minutes helps season the meat without turning the texture mushy, which can happen if you leave chicken sitting in a salty sauce too long.
Below, I’ll show you why the sauce should be split before marinating, how to get that lacquered finish without burning the sugars, and a few smart swaps if you need to work with what’s already in the pantry.
The sauce thickened up beautifully and the chicken stayed tender even after simmering in the glaze. My husband kept saying it tasted better than the takeout version we usually order.
Save this glossy teriyaki chicken for the nights when you want sticky, caramelized takeout-style chicken over rice without the takeout bill.
The Part That Stops Teriyaki From Turning Watery
The most common mistake with teriyaki chicken is letting the sauce do everything at once. If you cook the chicken in all of the marinade and then try to thicken what’s left, you’ll end up with a pan that tastes fine but never gets that shiny, clingy glaze. Splitting the sauce before the chicken goes in solves that problem and keeps the final coating clean and glossy.
Chicken thighs are the right cut here because they stay tender while the sugars in the sauce caramelize on the surface. Breast meat can work, but it goes from juicy to dry fast once the pan heat and sticky glaze start working against it. The quick rest in the marinade seasons the outside without giving the soy sauce enough time to tighten the meat too much.
- Soy sauce — This is the base of the teriyaki flavor, so use a brand you actually like tasting. Low-sodium soy sauce works if you want a little more control, but don’t swap in regular table salt and expect the same depth.
- Brown sugar and honey — The sugar gives body and the honey gives shine. You need both if you want that lacquered finish that sticks to the chicken instead of sliding off.
- Mirin or rice vinegar — Mirin gives the sauce its classic sweet-tart edge. Rice vinegar is the backup if that’s what you have, but it’s sharper, so the honey matters more in that version.
- Cornstarch slurry — This is what turns the pan juices into a glaze. Add it only after the sauce simmers, or it can clump and leave you with a paste instead of a smooth coating.
- Sake or dry sherry — Optional, but worth using if you have it. It rounds out the sauce and adds a little restaurant-style complexity without making the dish taste boozy.
What Each Ingredient Is Actually Doing in This Recipe
- Primary ingredient (the star) — Quality matters most. Choose the best you can find.
- Cooking medium (oil, butter, or broth) — This carries flavors and prevents dryness.
- Seasonings (salt, pepper, spices, herbs) — Layer flavors so nothing overpowers. Build depth gradually.
- Aromatics (garlic, onion, herbs) — Cook with fat to bloom flavors. Become the foundation.
- Supporting ingredients — Complement the main ingredient without overpowering it.
- Sauce or liquid (if applicable) — Brings flavors together. Balance richness with acid.
- Acid (lemon, vinegar, wine, or other) — Brightens and prevents flat-tasting results.
- Final finish (garnish, glaze, or sauce) — Prevents one-dimensional taste and adds visual appeal.
Getting the Sear Before the Glaze Goes On
Mix and Split the Sauce First
Whisk the soy sauce, brown sugar, honey, mirin, sake, garlic, and ginger until the sugar dissolves, then pour off half for the marinade. That reserved half is the part you’ll simmer into sauce later, and keeping it untouched is what protects the final glaze from raw chicken juices. If you skip this split, the sauce can look muddy and taste flat.
Marinate Briefly, Not All Afternoon
Coat the chicken in the other half of the sauce and let it sit for 20 minutes. That’s long enough to season the surface and short enough to keep the texture firm. Much longer and the soy sauce starts working like a cure, which can make the thighs taste salty at the edges instead of balanced.
Sear Until the Edges Go Deep Brown
Heat the oil in a large skillet over medium-high heat and lay the chicken in a single layer. You want a loud sizzle as soon as it hits the pan; if the pan is too cool, the chicken will steam before it browns. Cook until the undersides are deeply caramelized and the chicken reaches 165°F, then move it out of the skillet before the sugars burn.
Turn the Pan Juices Into a Finish
Pour in the reserved sauce and bring it to a simmer, scraping up the browned bits from the pan. Stir in the cornstarch slurry and cook until the liquid turns thick and glossy enough to coat a spoon. If it stays thin, it hasn’t simmered long enough; if it gets gummy, the heat was too high and the starch set too fast.
Coat and Serve Immediately
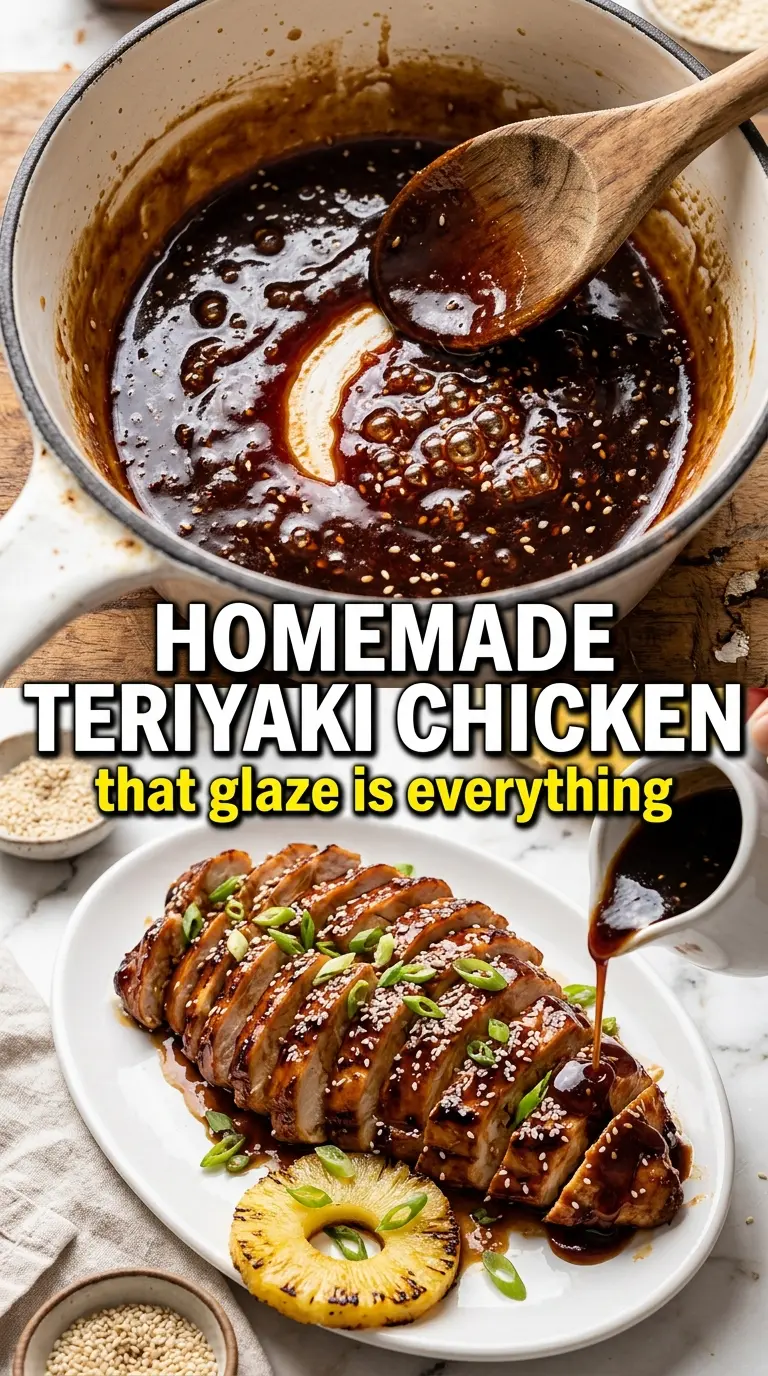
Return the chicken to the pan and turn it in the glaze until every piece is lacquered. The sauce should cling in a shiny layer and leave a dark trail in the pan when you spoon it up. Serve it over steamed rice while the glaze is still fluid enough to soak into the grains, then finish with sesame seeds and sliced green onions.
How to Tweak This Teriyaki Chicken Without Losing the Sticky Glaze
Gluten-Free Version
Use a gluten-free soy sauce or tamari. The sauce will still thicken and glaze the same way, but tamari tends to taste a little rounder and less sharp, which works nicely with the honey.
No Mirin on Hand
Use rice vinegar in the same amount, then keep the honey in place so the sauce doesn’t come out too sharp. You’ll lose a little of the mellow sweetness mirin brings, but the glaze will still finish glossy and balanced.
Use Chicken Breast Instead
Breast meat works, but slice it into large cutlets or even pieces so it cooks quickly and stays tender. Pull it the moment it reaches 165°F, because extra time in the glaze dries it out fast.
Make It Without Alcohol
Skip the sake or dry sherry and add an extra teaspoon of rice vinegar if you want a little more brightness. The dish still tastes complete without it; you just lose a small layer of depth in the sauce.
Storage and Reheating
- Refrigerator: Store leftovers in an airtight container for up to 4 days. The sauce will thicken more as it chills, which is normal.
- Freezer: It freezes well for up to 2 months. Freeze the chicken and sauce together in a sealed container, then thaw overnight in the fridge.
- Reheating: Warm gently in a skillet over low heat with a splash of water to loosen the glaze. Microwave reheating works in a pinch, but use short bursts so the sugar doesn’t scorch and the chicken doesn’t dry out.
Questions I Get Asked About This Recipe

Teriyaki Chicken
Ingredients
Equipment
Method
- Whisk together soy sauce, brown sugar, honey, mirin, sake, garlic, and grated ginger until the sugar dissolves and the mixture looks uniform. Reserve half for the sauce and pour the other half over the boneless skinless chicken thighs.
- Cover and marinate the chicken in the reserved half for 20 minutes in the refrigerator, so the glaze will cling better. Let the chicken sit at fridge temperature during marinating for best flavor penetration.
- Heat vegetable oil in a large skillet over medium-high heat until shimmering, then lay the marinated chicken in the pan. Cook for 5-6 minutes per side until caramelized with dark amber blistered edges.
- Check doneness by measuring the thickest part of the chicken; when the internal temperature reaches 165°F, remove the chicken to a plate.
- Pour the reserved marinade into the skillet and bring it to a simmer over medium-high heat. Stir continuously while you thicken with the cornstarch slurry, then cook for 2-3 minutes until the sauce turns thick and glossy.
- Return the chicken to the pan and turn to coat in the teriyaki sauce until sticky and well glazed on all sides. If needed, spoon extra sauce over the top for an even finish.
- Serve the teriyaki chicken over steamed rice and drizzle with any extra sauce from the skillet. Garnish with sesame seeds and sliced green onions so the coating looks set and textured.